Whenever we start writing on Word 2016/2017/2018, we sometimes forget to save the file and exit the file without saving it and later on cry for the fact that our data got lost.
Contents
But does it really get lost?

Since Microsoft Word 2016 has a feature called AutoRecover that helps you in recovering your unsaved or lost data.
How to Recover Unsaved Documents From Windows 10
If you have ever closed your Word document by mistake without even saving it and wishes to get your document back, you can easily get it back. All you have to do is follow the steps given below.
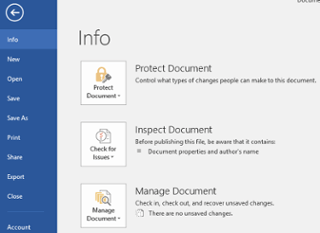

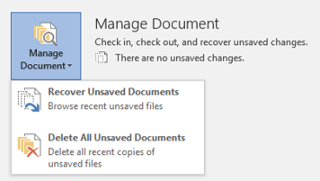
To get the unsaved document back, open the Word file and go to the “File” option and click on the “Open” button. A window will open where you will a list of your recent documents. Click on the “Recover Unsaved Documents” button and it will open a folder that will contain all your unsaved documents from the last 4 days.
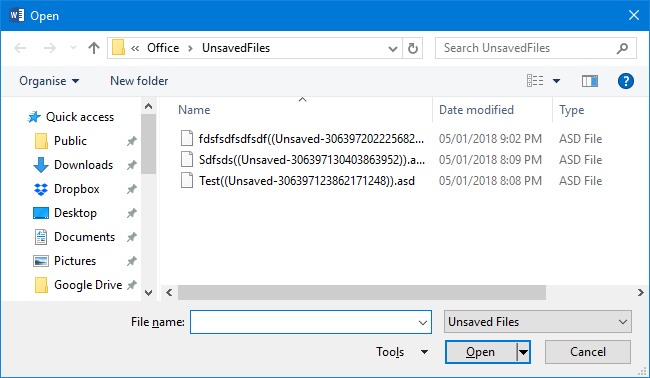
Once you find your document, double-click on it and you will see a message on screen saying ‘This is a recovered file that is temporarily stored on your computer’. Open the document and click on the “Save As” button to save your file permanently on your preferred location.

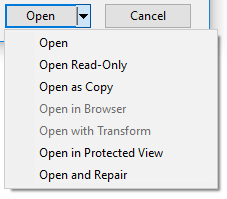
Even after following these steps you are not able to get to your file then that means your file has become corrupted. To still open the file, click on the drop-down arrow next to the “Open” button. Choose the “Open and Repair” option from there. This will try to automatically fix your problem.
The alternative option for the opening unsaved file is to press Windows Key + R to open Run. Enter the following code-
C:\Users\%USERNAME%\AppData\Local\Microsoft
After entering the code, press OK.
You will get your unsaved data back.
How to Use AutoRecover
AutoRecover is featured offered by Microsoft Office. It is used when the Word gets disrupted, for example when the system crashes or when you have a power cut-off. At that time there is no way left by which you can get your document back. For those problems, Office launched AutoRecover that helps you recover your lost data.
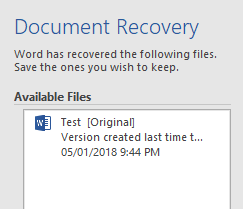
In order to use AutoRecover, open a Word file and you will see a Document Recovery panel. It will list all the available files with their names and time. You can open the files one-by-one to see the content and if you want to save any file, just click on the drop-down button near the file name and click on the “Save As” button and save the file at your desired location.
AutoRecover has a disadvantage too, the Word offers the recovered document on the initial launch only, so if you want to save any data, you should not delay much or else it will get lost.
How to Customize AutoRecover
Usually, AutoRecover gets enabled by default, but if it does not then open a Word file and click on the File button and choose Option, from there go to the Save button. Check whether the “Save AutoRecover information every Y minutes” is ticked or not, if it is not ticked and check it.
You can change the time interval by which your information will get saved as per your wish.
It is recommended to tick the “Keep the last AutoRecover version if I close without saving” too.

If you see at the bottom, you will see an option of AutoRecover file location. You can change the recovered file location by clicking on the Browse… button, after clicking on the button, go to the folder path and click on the “Ok” button.
This way you can customize AutoRecover.
Final Thought
AutoRecover is definitely a way by which you can recover your lost data but instead of being dependent on this, it is better to always save your Word document while writing, this will keep your document safe.
Also, it would be good if you regularly take the backup of your file so that even if it gets lost, you can easily retrieve it. Outlook, Notepad, and other third-party tools help you in keeping the backup of your files.
But even if in any case your data gets lost then you obviously have solutions by which you can recover your file.


