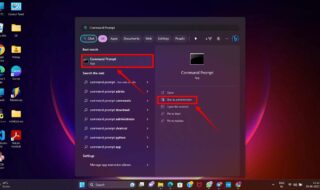
We all delete stuffs from our computer and recycle bin has been storing those deleted files for us unless we permanently delete files right away. The recycle bin works as a utility that gives us an opportunity to restore deleted files if we ever need them again. Whether it is unintentional, or you need those deleted files back, this little software is an integral part of being able to retrieve your deleted files quickly.
There are occasions when the recycle bin can be corrupted where it becomes completely inaccessible. In such cases, Windows promptly ask users to empty the bin where all files will be permanently deleted. If you are reading this, chances are that you do not want to forever remove all the files inside of the recycle bin. You are here to find solutions on ways to restore your files again on your computer. So, this guide will tell you about numerous ways you can restore files from corrupted recycle bin.
Contents
- Why Do Recycle Bin Gets Corrupted on Windows 11?
- Ways To Fix Recycle Bin Corrupted Error on Windows 11
- Method 1: Use the CHKDSK method
- Method 2: Reset the Recycle Bin Using Command Prompt
- Method 3: Run the System File Checker (SFC) Tool
- Method 4: Scan for Malware and Viruses
- Method 5: Perform a System Restore
- Method 6: Reinstall Recycle Bin
- Method 7: Check for Update
- Method 8: Use Registry Editor
- Method 9: Use Reliable Third-Party Tool
- Final Words
Why Do Recycle Bin Gets Corrupted on Windows 11?
Understanding the root causes of Recycle Bin corruption before implementing fixes will help avoid future occurrences of the same problems. Common causes of a corrupted recycle bin include the following:
- Corrupt Dynamic Link Library (DLL) Files: The Recycle Bin and other system apps depend on DLL files to function. Corruption in these files might cause problems with the Recycle Bin and interfere with multitasking.
- Errors with the $Recycle.Bin Folder: Every drive’s Recycle Bin contains a secret system folder called $Recycle.bin. The Recycle Bin may become contaminated or unusable due to errors in this folder.
- Abrupt Shutdowns: System file corruption, including problems with the recycle bin, can result from power outages or sudden system shutdowns.
- Storage Drive Errors: The Recycle Bin may not work properly due to corruption in the storage drive, which may necessitate a drive scan or repair.
- Attacks by viruses or malware: Malicious software has the ability to corrupt system files, including those in the Recycle Bin.
Ways To Fix Recycle Bin Corrupted Error on Windows 11
The following fixes will help you with recovering files that are inside your corrupted recycle bin. These fixes are mainly focused towards Windows 11 users, however, the methods are also applicable on other versions of Windows as well.
Method 1: Use the CHKDSK method
CHKDSK is a simple command that you can run to fix logical erros on your Windows 11. You simply need to access Command Prompt or Windows Powershell to run this fix.
- Press Win + S to open up Windows Start where you have to type “cmd” click on the cmd shown in the result.
- Now Windows Powershell will run on your computer.
- Type the following command inside powershell and hit the enter button: chkdsk X: /R
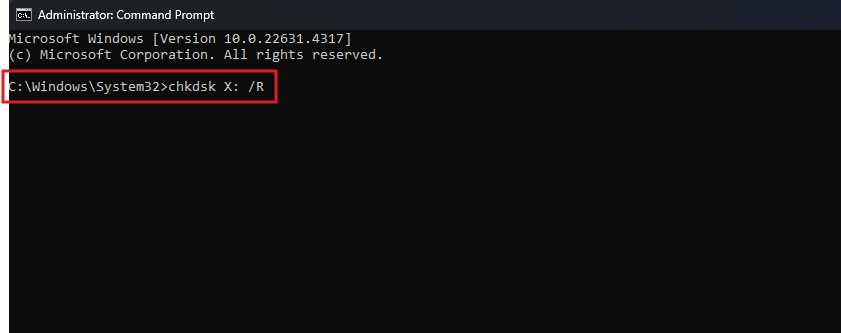
- After you execute CHKDSK command, it will scan your system, your drives in particular.
After the scan is complete, do a quick restart to complete this whole process.
Method 2: Reset the Recycle Bin Using Command Prompt
Another method for clearing corruption and resetting the Recycle Bin is provided by the Command Prompt. By using the command line to remove the $Recycle.bin folder, Windows is able to regenerate it when it reboots.
How to Use the Command Prompt to Reset the Recycle Bin:
- Launch the CMD tool as the admin of the system which is done by doing a right click on CMD.
- Enter the following Command Enter rd /s /q X:\$Recycle.bin, substituting the letter X for the drive in question, then hit Enter.
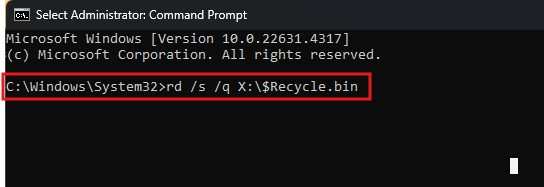
- Restart your system once the process is finished. Upon rebooting, Windows will generate a new $Recycle.bin folder, which might resolve the Recycle Bin issue.
Method 3: Run the System File Checker (SFC) Tool
A built-in Windows utility called the System File Checker (SFC) is intended to identify and fix corrupted system files, particularly those associated with the Recycle Bin. One of the most popular solutions for Recycle Bin problems is this one.
How to Run SFC:
- Enter cmd into the Windows search box, then choose Run as administrator by right-clicking on the Command Prompt.
- Press Enter after typing the command sfc /scannow.
- Any corrupted system files will be automatically found and fixed by the SFC scan. After finishing, restart your computer to see if the problem with the recycle bin has been fixed.
Method 4: Scan for Malware and Viruses
A virus or malware infection could be the source of the Recycle Bin corruption if none of the aforementioned fixes resolve the issue. To get rid of any risks, run a comprehensive scan with Windows Security.
How to Check for Malware and Viruses:
- Type “Windows Security” into the search field and open it.
- Choose Threat & Virus Protection: Select Scan options under Virus & Threat Protection.
- Perform a Complete Scan: Click Scan Now after choosing Windows Defender Offline Scan.
If Windows detects any threats, it will run a thorough system scan and restart your computer. You may view the results by selecting Virus & Threat Protection > Protection history when the scan is finished.
Method 5: Perform a System Restore
Performing a Windows system restore can fix and repair a corrupted Recycle Bin. The computer goes to back a state when recycle bin was working fine. This method has a higher chance of fixing the issue if the problem only occurs recently following an update or windows installation.
- To begin, press & hold the Windows and S button to open the search box.
- Type “Create a restore point” into the search box.
- Click on the most suitable result shown in the result which is “Create a restore point”.
- Inside System Properties window, select the restore option as shown.
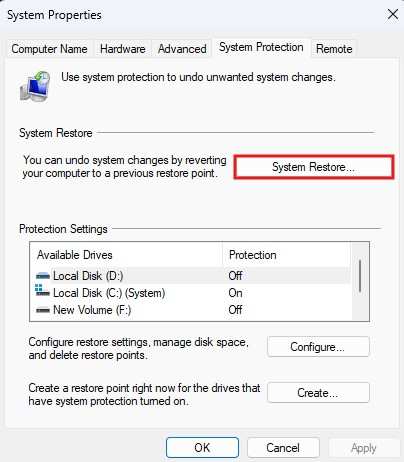
- Select a restore point that you have created in the past to fix the Recycle Bin problem and then click Next.
- To finish the repair process, complete the rest of the instructions.
Restart your PC or laptop and run the Recycle Bin to see if the corruption issue has been fixed.
Method 6: Reinstall Recycle Bin
This method will not exactly help you recover the deleted files but it can fix the corrupted recycle bin issue. Doing a fresh reinstall of the recycle bin will remove this utility as well all of its permissions. Make sure to recover all your deleted files if you can.
- The first move is visit the file explorer and open up “This PC”.
- When you are inside the file explorer, head over to the ellipses.
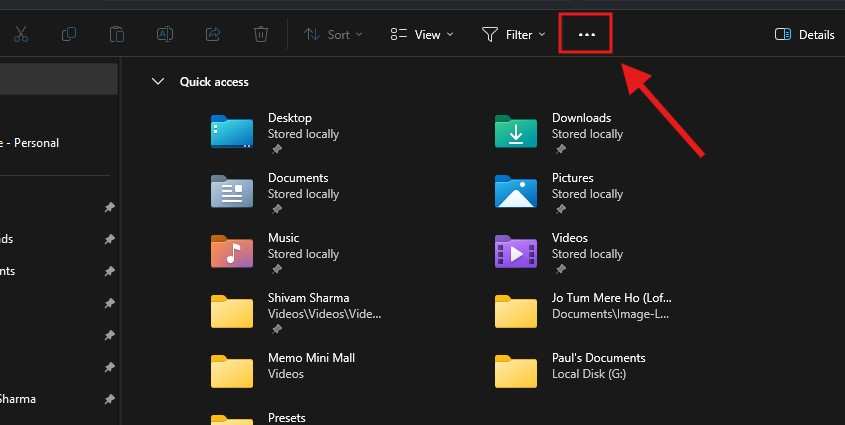
- Now select “Options” and then click on “View” tab. All of these tabs are located on the top side.
- When the new options folder opens up, go to “View” section and you will see a list of options under “Advanced settings”.
- Uncheck the option that hides protected files of the windows.
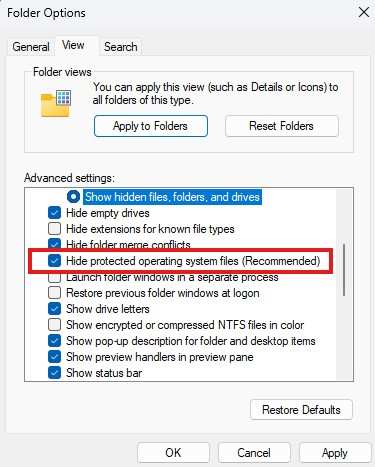
- Hit on “Apply” and “OK”.
- Open File Explorer again and go to the partition that shows the corruption error.
- Inside the partition, find $Recycle.bin folder and delete it.
- Now close all Windows and do a right click on the recycle bin and select “Personalize”.
- Select Desktop icon settings from the left pane and choose recycle bin.
- Hit the “OK” button.
Method 7: Check for Update
Windows 11 regularly pushes iterative updates to fix bugs and improve the security measures of the operating system. There are reports that many people are able to overcome the recycle bin corruption issue after doing an update. So try your luck and see if updating your windows is all you had to do.
- In your computer, do a right click on the “Start” and select “update & Security”.
- Go to “Windows Update” on the left side and it’s content will show up on the window.
- Click on “check for update” if there is not an update already.
- After the check is done, hit on “install” if you see a new update.
Hopefully, updating your system will also fix the recycle bin not working anymore.
Method 8: Use Registry Editor
Registry editor can make users disable and re-enable recycle bin. This can result in fixing the corruption error.
- Press Win + R to open run and type “regedit”.
- Hit enter and open the registry editor.
- Paste the following path in the editor: HKEY_LOCAL_MACHINE\SOFTWARE\Microsoft\Windows\CurrentVersion\Explorer\Desktop\NameSpace.
- Look for the key similiar or same as {645FF040-5081-101B-9F08-00AA002F954E}.
- Now do a right click on the given key and select “Modify”.
- Inside Value data box, you need to change it to “Recycle Bin”.
Method 9: Use Reliable Third-Party Tool
There are many reliable tools on the internet that can help you recover your data loss. By fixing the corrupted recycle bin, you may have lost all your files permanently and there is not a native method to recover your old files. Thankfully, you can take a look at some freemium or premium data recovery tools for Windows 11. Simply install them and follow its instructions to restore data loss.
Final Words
Since technical issues does not have guaranteed fixes, you have to perform these methods at your own risk. Be sure to back-up all your files and store it on another computer or secure drive. Nonetheless, these methods are highly effective and they will certainly help you with recycle bin corruption problem.
