Whenever you upgrade to a newer version of Windows, the OS keeps the old version files in your storage. These obsolete files can take up a significant amount of space and can hinder the performance of your games and programs. Although these obsolete files help users to go into recovery mode and revert back, they become redundant when the user has no intention of reverting to their Windows version.
Temporary files, outdated downloads, and old.Windows files in the Recycle Bin are examples of obsolete files that can build up over time, using important disk space and sometimes slowing down your system. Thankfully, Windows 11 comes with built-in tools like Command Prompt, Storage Sense, and Task Scheduler that help you automate the removal of these files. With the aid of this tutorial, you will be able to configure automated file deletion and maintain a clean, effective, and trouble-free system without having to constantly do human intervention.
Contents
What are Windows Obsolete Files?
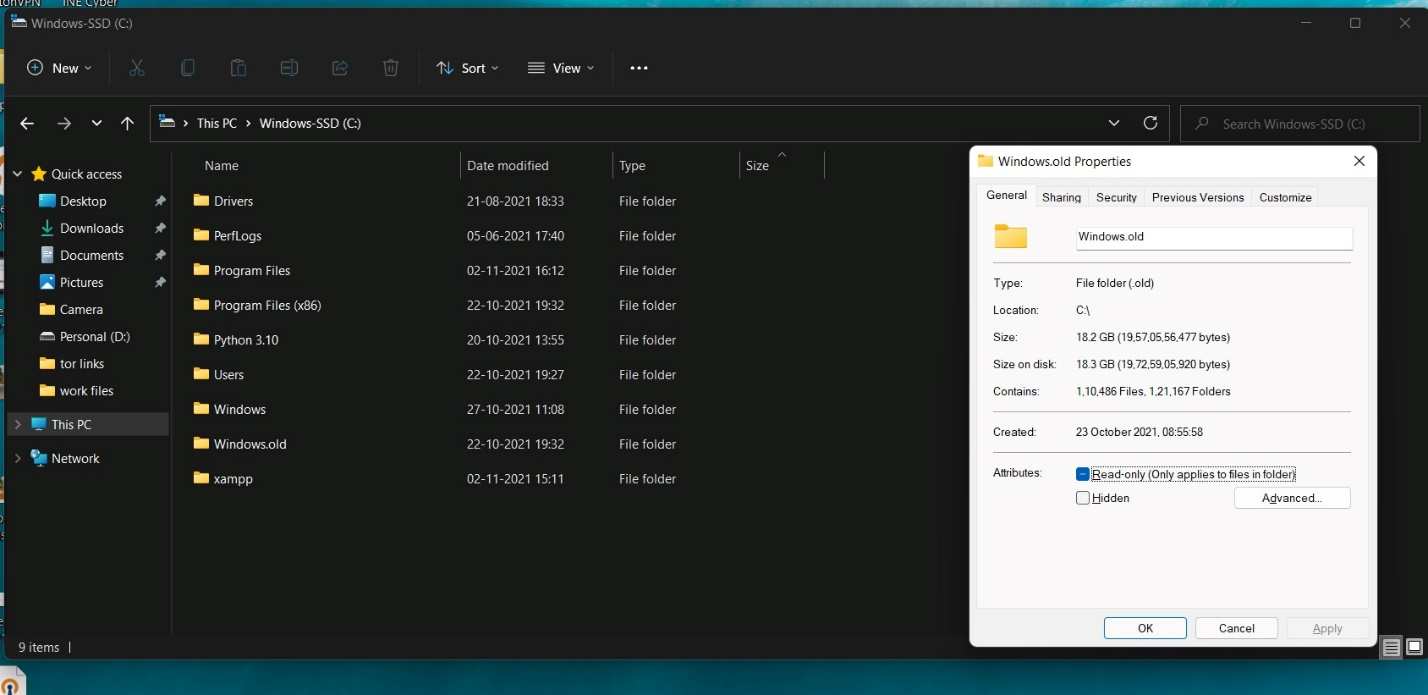
Typically located on the C: drive, the Windows.old folder is a system folder that was generated after the Windows operating system update. A duplicate of your prior Windows installation, including user data, system files, and program files, is kept in this area. Windows.old was created to enable users to go back to their prior operating system in case they have problems or decide they prefer the older version after updating.
The Windows.old folder might be helpful if some personal data were not successfully transferred during the upgrade, in addition to offering a safety net for downgrading. Files from this folder can be manually moved by users to the proper location on their new operating system.
The Windows.old folder takes up a lot of disk space, though, so if your C: drive is almost full, this might be an issue. To save room, you can manually remove the folder, but doing so will remove your ability to go back to an earlier version of Windows. One month following the upgrade, Microsoft automatically removes the Windows.old folder; thus, if you want to preserve it longer, think about backing it up to a different location.
Why You Should Delete Windows Obsolete Files?
- Free Up Disk Space: Windows outdated files can take up many gigabytes of space. Examples of these files are found in the Windows.old folder. Getting rid of these can help free up important disk space, particularly if your drive is almost full.
- Boost System Performance: A computer that has a full or almost full hard disk will perform slower. Eliminating superfluous files guarantees a more responsive and efficient system.
- Minimize Clutter: Keeping out-of-date files clogs your system and creates nuances within your storage management. You can maintain a clean and orderly system by deleting these files.
- Boost Stability: Outdated system files may lead to confusion or conflicts. Eliminating them can improve system stability and lower the possibility of problems resulting from out-of-date data.
- No Longer Needed: These files can be securely deleted after you’re satisfied with your current Windows setup and have no intention of going back to an earlier version.
- Automated Deletion: Although Windows will remove these files automatically after a month, you may instantly increase efficiency and free up space by manually eliminating them sooner.
Ways to Delete Obsolete Files on Windows 11
Adhere to the methods one by one and you will surely create space for other software after deleting Windows Obsolete files.
Method 1: Remove Obsolete Files From Storage Settings
To help you manage disk space more effectively, Windows comes with a built-in tool called Storage Sense that may automatically erase obsolete files. This is how to apply it:
- To access the Settings app, press Win + I.
- Select Storage from the list on the right after selecting System from the left panel.
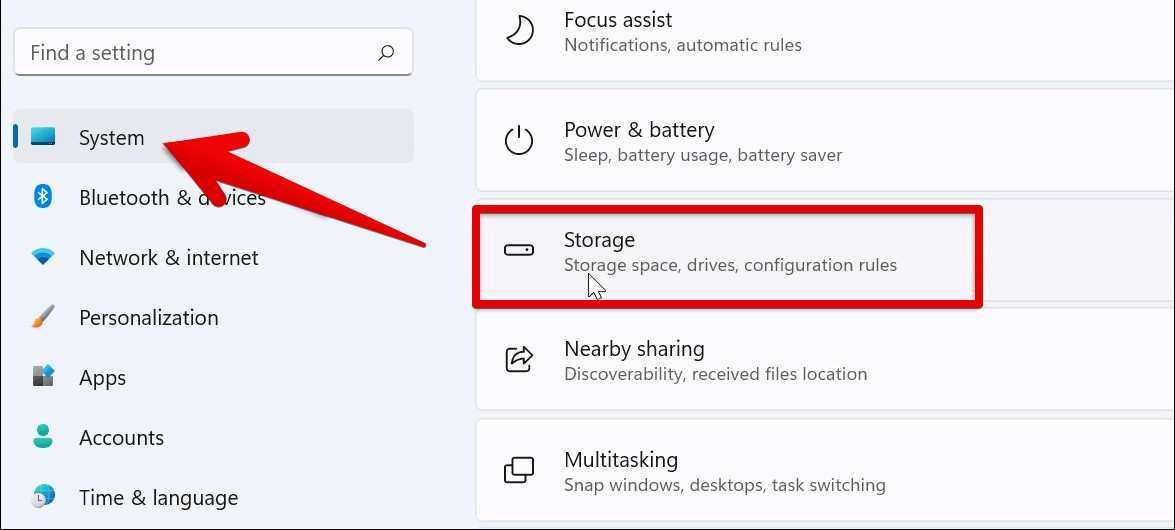
- Navigate down to Storage. To access its settings, click it after turning it on. The frequency at which Storage Sense should execute is selectable in the Configure cleaning schedules section.
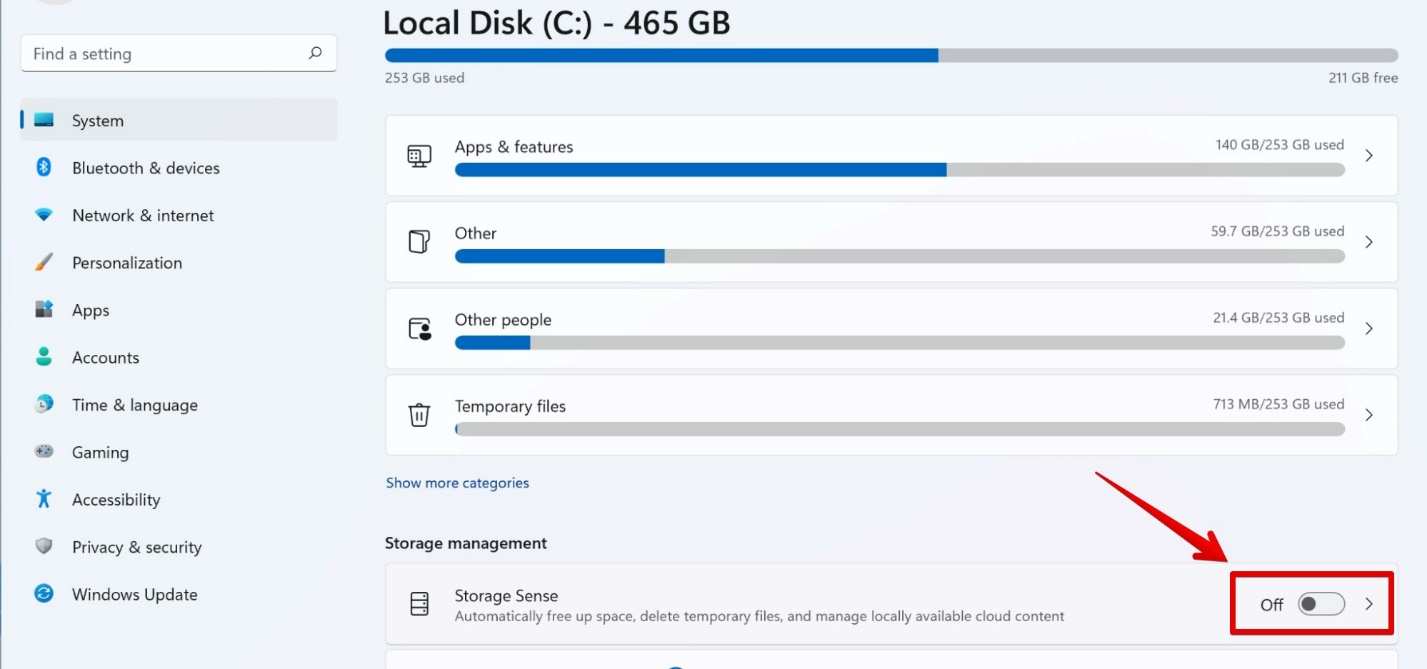
- You may choose to run it every day, every week, every month, or just (by default) when there is not enough disk space.
- Additionally, you may choose how long files should stay in the Recycle Bin before being automatically removed. Select a period of time that works for you. Storage Sense may also remove data from your Downloads folder. You may specify the amount of time after which files will be erased, much like with the Recycle Bin.
After setting up your choices, click Run Storage Sense Now to put the changes into effect. This guarantees that your storage is kept at its best by having your system automatically manage and delete outdated data.
Method 2: How to Use a Command Prompt to Delete Old Files
With Windows, you may use the Command Prompt, a useful tool for running text-based commands, to remove outdated files. This is how you do it:
- To open the search box, press Win + S. Type cmd.
- In order to launch the Command Prompt, choose Run as administrator.
- Use the following command to remove files that haven’t been changed in 30 days:
ForFiles /p “C:\path\to\folder” /s /d -30 /c “cmd /c del /q @file”
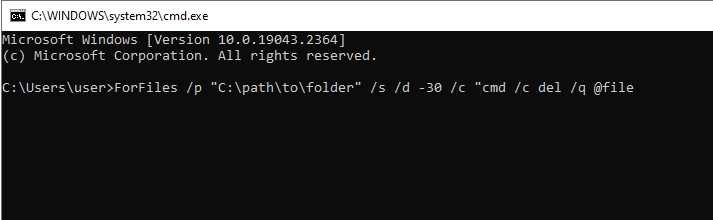
- To clear up a folder, substitute “C:\path\to\folder” with its path and “/d -30” with the required duration in this script. For instance, the following command might be used to remove any files older than sixty days from the BSS folder:
ForFiles /p “C:\path\to\folder” /s /d -30 /c “cmd /c del /q @file”
Old files are deleted from the place you specify with this command.
Method 3: Clean Windows.Old Files Using Windows Task Scheduler
One useful Windows utility is Task Scheduler, which lets you automate recurring processes, such as deleting files that are no longer needed. You may make sure that files in a certain area are removed according to the criteria of your choice by creating a task. This is how Task Scheduler may be used for that:
Step 1: launch the task scheduler.
To begin, launch the Start menu by hitting the Win key. In the search field, type Task Scheduler, then choose it from the list of results.
Step 2: Create a new folder in step two
Make a new folder and arrange your assignments inside of it. Choose New Folder from the menu when you right-click on the Task Scheduler Library in the left pane. Then, give it a name (such as “Cleanup Tasks”). To save the folder, click OK.
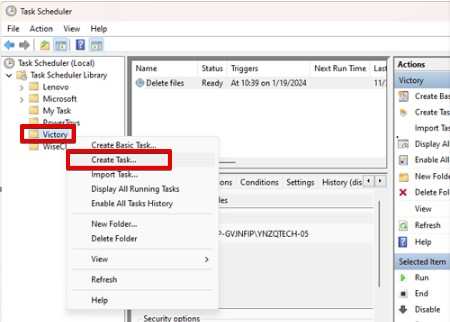
Step 3: Start a New Assignment
Next, choose the newly formed folder with a right-click menu after expanding the Task Scheduler Library. From the contextual menu, choose Create Task. In doing so, the task creation box will open.
Step 4: Configure the General Tab
Give your assignment a meaningful name under the General tab, such as “Auto-Delete Old Files.” To make sure the job continues even if you are not logged in, choose Run whether the user is logged on or not under the Security Options section. To ensure that the job may execute without requiring your password, make sure the option Do not save password is unchecked.
Step 5: Configure the Trigger
Click the New button after selecting the Triggers tab. Choose “On a schedule” from the drop-down box under “Begin the task.” Schedules may be set up daily, weekly, or monthly based on your needs. To save the trigger settings, click OK.
Step 6: Configure the Action
To start an action, select New from the Actions menu. Select “Start a program” from the Action drop-down menu. Enter ForFiles in the Program/script box. Then, type the following command in the Add parameters box: /p “C:\path\to\folder” /s /d -30 /c “cmd /c del /q @file”
As with the second technique we covered before, adjust the path and the time criteria as necessary. With this command, the system is instructed to remove all files that haven’t been altered in the last 30 days from the designated folder.
Step 7: Complete Configuration
Finally, choose the Settings tab and go over the following settings:
- Permit work to be completed as needed. In the event of a missed planned start, execute the job as soon as you can. Restart each (choose an appropriate interval) if the job fails.
- Press OK to complete the assignment.
- After it is configured, the Task Scheduler will automatically remove files from the designated place on the predetermined schedule. To halt the automatic removal process, just remove the job from the job Scheduler.
Conclusion
If you are sure of not reverting back, then it is better to just get rid of the old Windows files from your system. Delete superfluous files automatically by using built-in utilities like Task Scheduler, Command Prompt, and Storage Settings. By doing this, you not only save time but also guarantee that your system will always be responsive and clean without requiring manual labor. Frequent file management and deletion improves system performance, keeps your workspace clutter-free, and keeps your machine in good working order. You may concentrate on your job with these automatic solutions, as Windows 11 will handle file management for you in the background.