Windows Defender tool constantly checks for malware and stores it in its scan folder. This may result in loads of scan history that hinder performance and take up your precious storage. You may help fix these issues and preserve your privacy by deleting the contents in this folder. However, the location where all the unwanted files are stored is not accessible to many users. This is why a crucial problem occurs and that is How to safely delete the data inside Windows Defender Scans Folder. Let’s see what are the methods to resolve your issue here.
Contents
Why You Should Delete The Windows Defender Scans Folder
The history of all scans and threats that Windows Defender has identified is kept in the Windows Defender Scans folder, specifically in the History subfolder. This folder fills up with a lot of data over time, taking up valuable disk space. It is necessary to regularly empty this folder’s contents even though it is system-protected and cannot be directly accessed or removed with ordinary Administrator permissions. Eliminating the scan history is a crucial step in fixing any possible Windows Defender problems. Sometimes accumulated data becomes corrupt, resulting in false threat detections or performance issues. You can possibly address these problems and enhance Windows Defender’s overall performance by removing the scan history and refreshing the database. 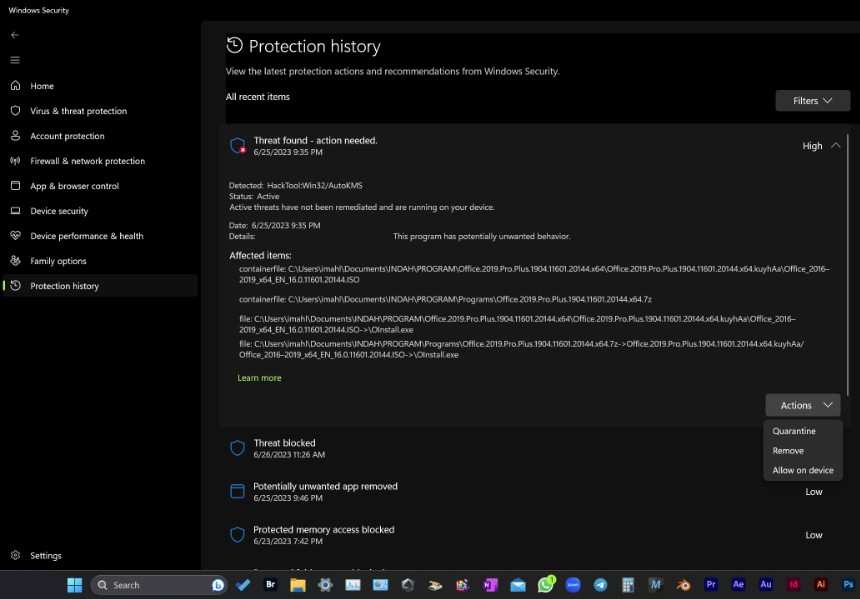 Erasing the scan history also improves your privacy. Records of previous scans and threats found are contained in the folder, some of which may contain sensitive data. By deleting these files, you may preserve your privacy by making sure that nobody else has access to your scan history. Note that although deleting this folder will erase the history of previous scans and threats found, the advantages of freeing up disk space, fixing possible problems, and safeguarding your privacy exceed the disadvantages. Maintaining this folder on a regular basis is an easy yet powerful technique to make sure your system functions properly.
How to Delete the Data in the Windows Defender Scans Folder
The History subfolder in particular under the Windows Defender Scans folder has the potential to hold a significant quantity of data from previous scans and threats found. In addition to using up important disk space, this data may result in privacy or performance problems.
Method 1: Use DISM
You can utilize the Deployment Image Servicing and Management Tool (DISM) to remove the contents of this folder. The procedures to successfully clear this folder are shown below. Step 1: Access Windows Terminal 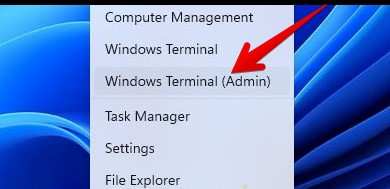
- To begin, either right-click the Start button or use the keyboard shortcut Win + X. Select “Terminal (Admin)” from the menu to launch the Terminal with administrator rights.
Step 2: Enter DISM There are other DISM commands that you will need to run in the Terminal window. These instructions scan for corruption, verify the Windows image’s integrity, and fix any problems. One by one, type the following instructions, hitting Enter after each one:
- Type the following to verify the Windows image’s integrity: DISM /Online /Cleanup-Image /CheckHealth
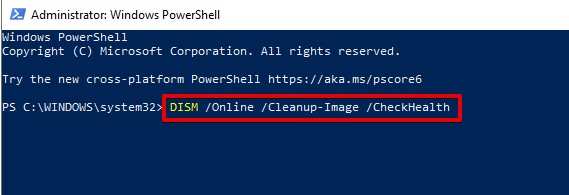
- After that, you need to scan for corruption of the store component and log the file in Windows Image. To do so, type the following code: DISM /Online /Cleanup-Image /ScanHealth
- The last command involves reparation of Windows Image and its command is: DISM /Online /Cleanup-Image /RestoreHealth
Let the prompt to finish before proceeding further. Each command’s progress and completion will be reported by the Terminal. Step 3: Access the Scans Folder Now you have to head to the Scan folder following the successful execution of the DISM instructions.
- Launch File Explorer and go to the following directory: C:\ProgramData\Microsoft\Windows Defender\Scans is the path.
- Once there, look for the History subfolder and remove it.
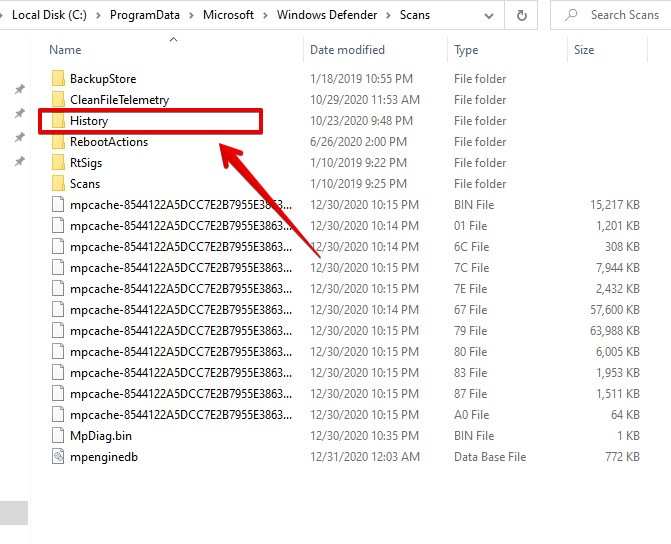 You may efficiently erase the data in the Windows Defender Scans folder, clear up disk space, fix possible problems, and safeguard your privacy, by following these instructions.
Method 2: Use Third Party Tools
There are a handful of out-of-the-box ways to tackle the inability to access or delete Windows Defender Scans Folder. Using a third-party tool like Wise Force Deleter can work in your favour. Here is How to Delete the files inside Scans Folder using Wise Force Deleter. Wise Force Deleter is a dependable and cost-free way to forcefully eliminate obstinate files and folders if you are unable to erase the Windows Defender Scans folder using traditional techniques. Your primary problem of being unable to remove the Windows Defender Scans folder will be effectively fixed thanks to this simple-to-use solution. To use Wise Force Deleter to remove the Windows Defender Scans folder, follow the instructions below. Step 1: Add File To add the file or folder you wish to remove, open the program and select the “Add file” or “Add folder” option. In this instance, you must add the History subfolder by navigating to C:\ProgramData\Microsoft\Windows Defender\Scans\History. Another option is to just drag and drop the folder inside the program. Step 2: Delete the File or Folder from the Index You may quickly remove the folder from the deletion list if you decide to keep it instead of deleting it. If you find a file that you don’t want to remove then pick it and click the “Remove” option. Step 3: Remove the Added Folder or File
- After verifying the files or folders you wish to remove, click the “Unlock & Delete” button located in the application’s lower right corner. There will be a pop-up window requesting confirmation.
- Verify that you really do want to remove the chosen directories or files.
The contents of the Windows Defender Scans folder will then be permanently erased from your computer by Wise Force Deleter. Please be sure that no installed apps or the Windows operating system require any files or folders before eliminating them. By taking this precaution, any risk of damaging your operating system or important system files is reduced. By following these instructions, you may use Wise Force Deleter to successfully and permanently erase the Windows Defender Scans folder, freeing up important disk space and fixing any related problems.
Resolving the Scans Folder Access Denied
If the above methods, especially the 2nd method are not working then you must allow access so that you can enter the Scans Folder. If you don’t have access to this folder, your computer will show a message like this: 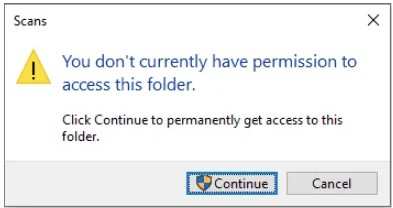
You must be thinking that it happens due to not being logged in as an admin. Unfortunately, that is not the case. So here are some fixes that can implement which can then lead you to delete the Windows Defender Scans Folder.
Fix 1: Use Safe Mode to Open
Using Safe Mode to start your computer might help you get around permissions problems.
- For users of Windows 10, go to Settings by pressing Windows + I, then select “Update & Security,” “Recovery,” and “Restart now” under Advanced Startup.
- If you are using Windows 11, go to the System tab, choose “System,” and then click “Restart now” under Recovery options’ Advanced Startup.
- Choose “Troubleshoot,” navigate to “Advanced options,” then choose “Restart” under Startup Settings after resuming.
- Select the required version of Safe Mode.
- After entering Safe Mode, use Windows + E to launch File Explorer, go to C:\ProgramData\Microsoft\Windows Defender\Scans, and erase the scan history.
- Try rebooting your computer to get out of Safe Mode.
Fix 2: Employ Different File Management Programs
When File Explorer isn’t able to launch with administrator rights, it might be helpful to use other file management programs. Locate a trustworthy file manager, open it with administrator privileges, and attempt to open the Windows Defender Scans folder. Bypassing the typical File Explorer permissions problems may work. Bonus Tip: Retrieve Files Windows Defender Deleted MiniTool Power Data Recovery may be used to restore vital files that Windows Defender may have erased during a malware check. Because it is read-only, this tool is very safe and effective. To get your files back, take the following actions:
- Install MiniTool Power Data Recovery on Windows: Download and run the application.
- Check for Erroneous Files: Start the application, choose the disk containing the files, and start a scan.
- Retrieve the Files: From the scan results, find the deleted files and choose to recover them.
You may fix offline scan difficulties and clean the protection history to better control Windows Defender issues:
- Restart your computer in safe mode by booting it into safe mode.
- Select ‘Hidden Items’ from the View menu in File Explorer.
- Delete the data off of C:\ProgramData\Microsoft\Windows Defender\Scans\History\Service.
- Launch Defender, restart your machine in normal mode and carry out an offline scan.
These procedures guarantee that you can restore erased files and keep Windows Defender running smoothly.
Conclusion
Malware logs of Windows Defender inside the Scans Folder can pile up overtime. Although the log files of Windows Defender take up storage in your disk, there is no simple way to delete them. That is why methods like DISM and using tools are essential to successfully delete the Scans Folder.


