Outlook does a tremendous job organizing emails, personal information, scheduling, etc The program keeps on getting better with updates that have been rolling for years. From personal level to big corporates, Outlook holds an important role in their functions on a day-to-day basis.
Just like every other program, Outlook has some hiccups within its system. The Add-in Missing errors are a prominent issue among people who use Outlook. Apart from empty add-ins, they can also be disabled independently due to Windows automatically detecting a problem.
The add-in present in this Microsoft software allows users to add extension-like tools to enhance the workflow. Although Outlook can work normally without add-ins, there are people who depend on this little extension to work ideally. So if you are having issues with the said feature of Outlook, then grasping the core issue is important.
Let’s uncover the fixes that you can implement to see the missing add-in again in your Outlook.

Contents
Common Causes Of Outlook Add-In Issues
Although Outlook add-ins are strong tools meant to boost productivity, occasionally problems arise that impair their ability to work as intended. Users can pinpoint the issue if they know the following common causes of missing add-ins.
- Disabled or deactivated add-ins in Outlook settings are a major contributing factor. Outlook updates, user changes, or performance problems detected by Outlook can all cause add-ins to become inactive. The “COM Add-Ins” option makes it simple to change these settings.
- Compatibility issues with older Office programs or Windows versions provide another concern. Since add-ins are frequently created for certain software versions, an update or incompatibility may make them inoperable.
- Add-in issues may also result from a corrupted Outlook profile. Essential settings are stored in profiles, and corruption in this file may interfere with Add-Ins’ ability to load or function properly.
- Third-party software conflicts are still another common issue. The scripts or functionality of the Add-In may be blocked or interfered with by security programs, extensions, or other system applications.
Lastly, problems may arise if the Add-In is out-of-date or improperly installed. Older versions of the Add-under or missing files may not function properly under more recent settings.
Normal Add-In functionality in Outlook can be restored by addressing these problems through setting adjustments, program updates, or conflict resolution.
Add-ins Missing Fixes
The methods below are meant for you to follow thoroughly and don’t necessarily have to be done in chronological order.
Fix 1: Script Unblock
One possible cause of your Outlook Add-In loading blankly is restricted scripts. You must activate Active Scripting in your internet settings in order to fix this.
- To begin, click the Windows button, type in “Tools,” and then pick “Internet Options.”
- Choose “Internet” under the “Security” category. Scroll down to the “Scripting” section after selecting “Custom level.”
- Click “Enable” to activate “Active Scripting.” Click “OK” in each active window to confirm the changes.
- Run the Add-In after finishing to see if the problem has been fixed.
Enabling Active Scripting permits the required scripts to execute, guaranteeing the Add-In operates without any disruptions.
Fix 2: Know Whether Add-in is active or disabled
There are three sections where outlook add-ins can be listed such as inactive, disabled, or active. Understanding the state of the Add-in is important to determine why it is not turning on. As a result, you will find the fix that corresponds with the type of state of the Add-in. Here’s how to determine the add-in list.
- Open the program and go to “File”.
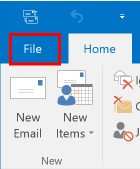
- After hitting the File section, a drop-down menu filled with options will show up. You have to select “options”.
- In the next section a new window, choose the “Add-ins” option.
- All the add-ins that you have installed will show up with regard to their designated list. The next step that you need to take should be determined by the type of section where the add-in is listed.
If the Add-in is inactive
- If the outlook add-in is present under the active section, simply go to file and then options again.
- Now head towards “Add-ins” and there you will see the “Manage” area.
- Select “COM Add-ins” after clicking Manage and hit “Go”.
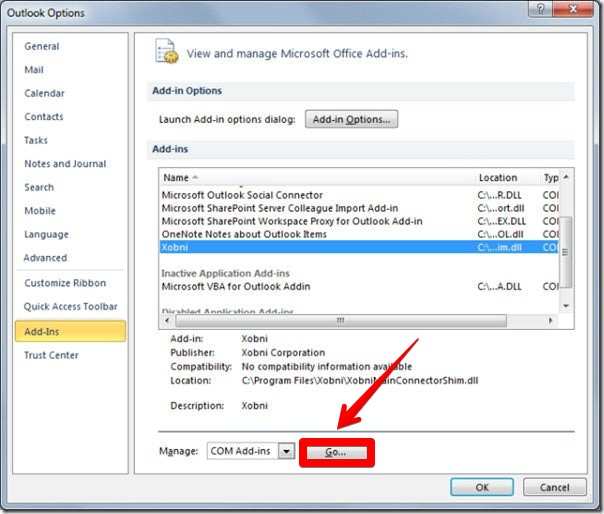
- Be sure also to tick the checkbox near the add-in area.
- Turn off (Shut down) the Outlook app and open it again after 5 seconds.
If the Add-in is Disabled
The story with disabled add-ins is also similar to the active section, the only difference here is with the “COM Add-ins”.
- Find and open “File” and then click “Options”.
- Enter inside the “Add-in” section.
- Now you are present again in the Manage area but this time, choose “Disabled Items” from the drop-down.
- Hit “Go” which you can see right beside the drop-down area.
- All the disabled items will show up and you need to choose the one that you want to re-enable.
- After choosing the one add-in that you want to enable, look down and go to the “Enable” button.
- Simply do a quick reset by turning off Outlook and opening it again after taking a deep breath.
Fix 3: Configure Account Connection
Outlook may only operate at its best if the account connection is correctly configured. Frequently, accounts are inadvertently configured with IMAP or POP3 rather than a direct connection to Microsoft Exchange. Check your connection type to fix this.
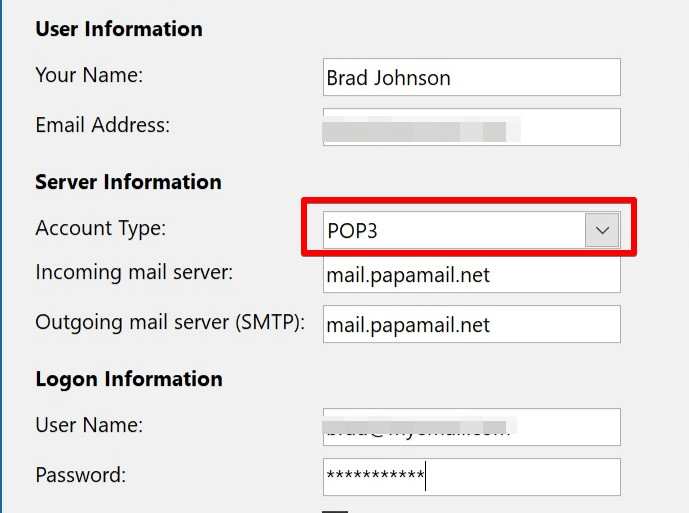
- Click Account Settings under the File tab, then choose Account Settings once again.
- Verify the account type under the E-mail tab.
- If “Microsoft Exchange” is displayed instead of IMAP, POP, or MAPI, the account is not set up properly.
Signing out of Outlook and back in with your Exchange or Office 365 login information will resolve this. This guarantees appropriate functionality and synchronization.
Fix 4: Recover Add-Ins Button
The Outlook ribbon is a dynamic toolbar with a tabbed organization that offers easy access to frequently used operations. It adjusts to your tasks contextually. When working with email attachments, for example, the Attachment tab displays the necessary tools. Your workstation is made more efficient when the tab vanishes after the task is finished. Users can concentrate on important tasks without having to sift through pointless options thanks to this user-friendly design, which guarantees productivity.
- If the ribbon no longer has the Add-In button, select File > Customize Ribbon.
- Move “Get Add-ins” to the right panel after creating a new group. You can create a new group by choosing New Group if “Get Add-ins” is on the left panel.
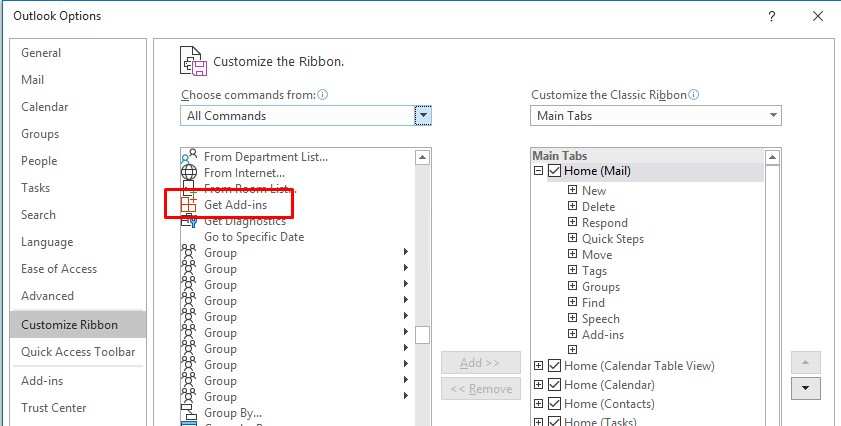
- To restore the button, click OK.
Fix 5: Registering Microsoft Teams DLL Files
Registering the required DLL (Dynamic Link Library) files can assist fix Outlook’s lack of the Microsoft Teams Add-In. To register the Microsoft Teams DLL files, take the following actions.
- Find the DLL file by searching for “This PC,” clicking the Start button, and then opening it.
- Inside “This PC” go to “C disk”. (C drive is where the system files are installed or your whole Windows is installed).
- Enter your user account which is located in the “Users” folder.
Now search for Microsoft.Teams.AddinLoader.dll file. Depending on the version (e.g., 1.0.20244.4), the precise route may change. Copy the path as you can see in the outlined area in red inside the image.
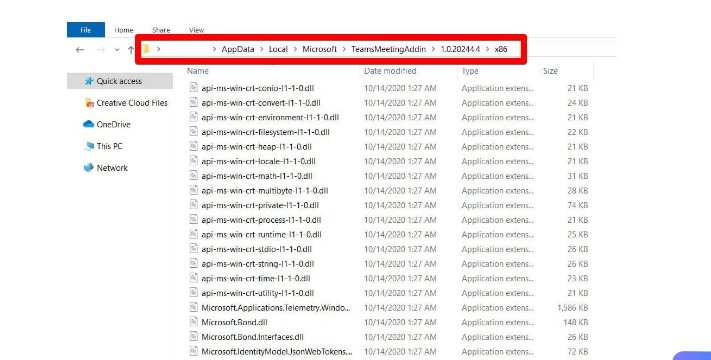
- Search for CMD in the Window’s Start, and after you find it, open it as the admin.
- The next step involves setting up DLL files. After pasting the copied path into the Command Prompt, type regsvr32 MicrosoftTeams.AddinLoader.dll Microsoft
- The following confirmation message will appear in a popup: “DllRegisterServer in Microsoft.Teams.” To close the box, click OK.
- Click the Start button, click the Power symbol, and then click “Restart”. When your computer turns back on, open Microsoft Outlook.
Verify that add-ins are enabled or check meeting policies to make sure Outlook isn’t blocked if the add-ins are still missing.
Conclusion
To finalize this guide, it is vital that you install add-ins correctly and properly. There are times when we impatiently add new add-ins and mess up some aspects of the installation. In those cases, the chances of getting corrupted data in Outlook PST files are very high. The methods above will ensure that you revert back to normal Outlook experience after you get the add-ins missing problem. You can also use other software outside of the Outlook domain to repair your program. Those professional tools for fixing PST files can also come in handy if you do not want to manually fix the problem you are facing in Outlook.
