For users who want to easily clone, backup, or restore their system, making a Clonezilla bootable USB in Windows 11 is a necessary step. Clonezilla is an open-source, robust disk imaging and cloning program that is frequently used for disaster recovery, data migration, and system recovery. With Clonezilla, having a bootable USB drive guarantees a hassle-free experience whether you’re upgrading your hard drive, protecting important data, or overseeing numerous system deployments.
Clonezilla allows sector-by-sector cloning, which ensures an exact duplicate of your operating system, apps, and files, in contrast to conventional backup techniques. Clonezilla is an effective and portable option because it can be used with a bootable USB without requiring the installation of other software. This tutorial will show you how to use Rufus, a reliable bootable media creation program, to generate a Clonezilla bootable USB on Windows 11.
You may avoid data loss, recover from system failures, and expedite disk cloning activities by following these guidelines, which will provide you with a safe and dependable backup solution.
Contents
- Why You Should Create Clonezilla Bootable USB?
- Accessibility and portability
- Information Security
- Adaptability
- Gradual Backups
- Compression of Data
- Safety
- Fix 1: Create a Windows 11 Clonezilla Bootable USB
- How To Choose CPU Architecture in CloneZilla?
- Fix 2 How to Use Third-Party Tools Like EaseUS Todo Backup to Make a Bootable USB
- Things That Should Be True For Your USB Bootable Device
- Final Words
Why You Should Create Clonezilla Bootable USB?
System administrators, IT specialists, and regular users who require a dependable and effective method of backing up, cloning, and restoring data must have a Clonezilla bootable USB. The following are the main justifications for making one:
Accessibility and portability
Clonezilla’s bootable USB stick enables you to use robust backup and cloning capabilities on any compatible computer. No complicated installs are required; just connect the USB and begin restoring or cloning your system.
Information Security
By making precise duplicates of your hard drives, partitions, or complete systems, Clonezilla protects your valuable information against catastrophic system crashes, hardware malfunctions, and inadvertent deletions. It is a dependable catastrophe recovery option as a result.
Adaptability
Clonezilla is helpful for a variety of platforms because it supports many file systems and storage media. Clonezilla offers a smooth experience whether you’re upgrading your system, changing a hard drive, or needing to access data on several devices.
Gradual Backups
Clonezilla allows incremental backups, which just update the recently modified data, as opposed to complete backups, which take up a lot of storage space. This optimizes storage consumption and cuts down on backup time.
Compression of Data
Clonezilla has compression tools that reduce backup pictures without sacrificing data integrity in order to conserve disk space. This is very helpful for handling big backups.
Safety
Clonezilla’s integrated encryption measures secure your data from unwanted access, guaranteeing that private information is kept safe.
Anyone searching for a quick, safe, and effective backup and cloning solution would be wise to create a Clonezilla bootable USB.
Fix 1: Create a Windows 11 Clonezilla Bootable USB
Rufus makes it simple to create a bootable USB for Clonezilla on Windows 11. To get your USB drive ready for disk cloning, follow these instructions.
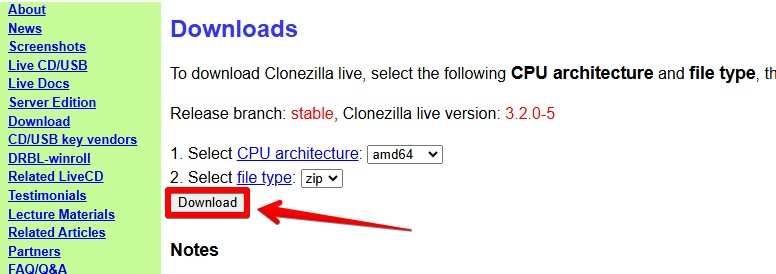
- Get Clonezilla: Choose a version from the Live release area on the official Clonezilla website. Based on the characteristics of your system, select the proper CPU architecture. To obtain the Clonezilla ISO file, choose the ISO file format from the drop-down option and press the Download button.
- Get your USB drive ready: Put a USB flash drive that should have adequate storage preferably 2GB or more.. Because the procedure will remove all current information from the drive, be sure you have a backup of any vital data.
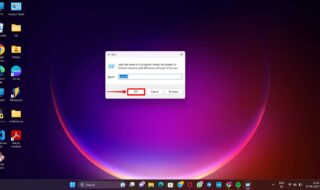
- Get Rufus and Use It: Open Rufus after downloading it from here. Click “Select” and select the Clonezilla ISO file after selecting your USB disk from the list. Rufus will set up the required parameters on its own.
- Make the USB bootable: To start the process, click START. After it’s finished, Clonezilla will be able to boot up your USB device.
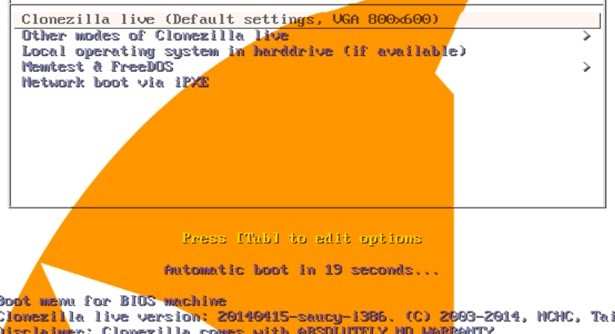
You may now use Clonezilla to image or clone your Windows 11 machine and boot from this USB device.
How To Choose CPU Architecture in CloneZilla?
You seem to be preparing to backup or clone your PC, which is a wise decision! For Clonezilla Live to function properly, selecting the appropriate version is crucial. To determine which one you require, follow these steps:
- Find out the architecture of your computer
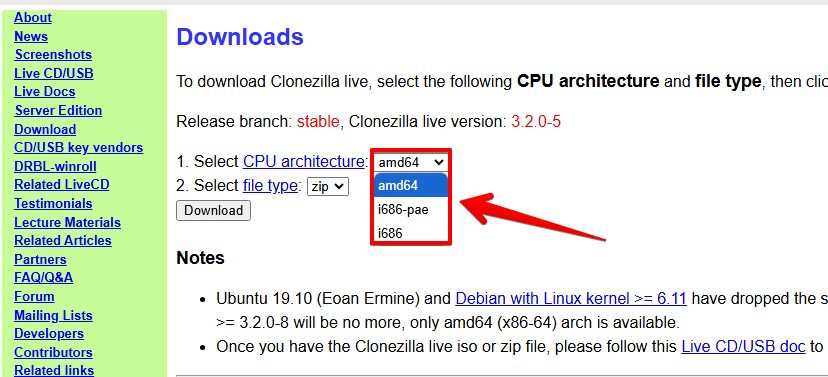
The majority of computers built in the last ten to fifteen years are 64-bit. This indicates that, despite having an Intel processor, they utilize the AMD64 architecture. 32-bit machines may be older, particularly those running Windows Vista or earlier. One of the i686 alternatives would be required in this situation.
- Verify if 32-bit PAE support is supported
32-bit computers can use more than 4GB of RAM thanks to a technology called PAE (Physical Address Extension). It is likely that you will require the i686-pae version if your older 32-bit PC has more than 4GB of RAM.
- If in doubt, begin with AMD64
Since the majority of contemporary x86 CPUs operate in 64-bit mode, Clonezilla itself advise starting with the AMD64 version.
Basic decision-making guide
Is your computer fresh, having been made within the last ten to fifteen years? Select AMD64. Is your machine 32-bit and older? Does it have RAM larger than 4GB? Select i686-pae. Does it have less than 4GB of RAM? Select i686.
Crucial Information
UEFI Secure Boot: The AMD64 version is required if you must utilize UEFI Secure Boot, a security feature included in more recent PCs.
You can always download a different version if the one you tried doesn’t work.
Fix 2 How to Use Third-Party Tools Like EaseUS Todo Backup to Make a Bootable USB
For both individuals and companies, EaseUS Todo Backup is a complete backup and recovery solution. It provides functions like incremental backups, disk cloning, file backups, and system backups. Its capacity to produce bootable USB drives is one of its main advantages. This enables users to recover data or restore their system even in the event that the computer is unresponsive. You can also go for EaseUS Todo Backup over Rufus to create a Clonezilla bootable USB that provides backup files and recovery tools. This is essential for disaster recovery situations since it guarantees that your system will be back online as soon as possible. Making this bootable USB with EaseUS Todo Backup is beginner-friendly and can do a solid job.
Making a bootable USB with third-party software, such as EaseUS Todo Backup, is an easy procedure that enables effective system backup or restoration. Take these actions:
- Get your USB drive ready: Make sure the USB flash drive you have is able to read and write data. Because the operation will remove all current files, make a backup of any vital data.
- Installing EaseUS Todo Backup: On a different computer, download and install EaseUS Todo Backup.
- Make the USB bootable: Open the program, and select Create Emergency Disk under Tools. Select USB as the location of the boot disk.
- Get Things Started: The software will automatically make the USB disk bootable after you click Create.
After that, you can use this USB to boot your system for system cloning, backup, or recovery.
Things That Should Be True For Your USB Bootable Device
Installing operating systems, restoring data, and using diagnostic tools all require a bootable USB drive. The requirements for a USB bootable device are broken down as follows:
- Capacity: The USB drive must have enough space to accommodate the files you intend to store on it. 8GB is typically the least for operating systems like Windows or Linux, and 16GB or more is advised.
- Quality: Make use of a trustworthy USB drive from a well-known manufacturer. Inexpensive or malfunctioning disks may cause issues when the computer boots up.
- Data Backup: Before making the USB device bootable, make sure you have backed up any vital data on it, as the operation will remove everything.
Final Words
Clonezilla Bootable USB is a great way to clone any disk on Windows 11 assuming you have set all the parameters correctly. It offers a quick method to copy your whole computer with the Clonezilla disk cloning tool. This becomes useful for system upgrades, protecting sensitive data, or resolving a corrupted operating system.
Making a bootable USB allows you to utilize Clonezilla’s robust capabilities while on the road and does away with the necessity for drawn-out installations. This guarantees that you may easily clone disks, transfer your operating system, and recover lost data if necessary.
You may rapidly set up your Clonezilla bootable USB using Rufus by following the easy instructions in this article. Invest wisely in a Clonezilla USB today to ensure seamless and trouble-free system management for Windows 11 users and take preemptive measures to safeguard your data and system.